|


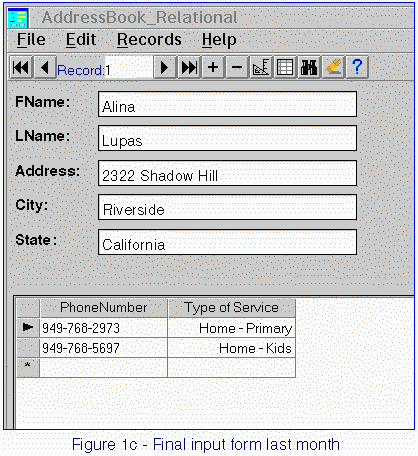
SCOUG OS/2 For You - June 1999The "Sundial" SIGFinishing the Phone/Address Database Built with DBExpertby Sheridan GeorgeThere were a total of eight in attendance at the May meeting. Again, much thanks to Randell for his research and for showing us the work-around for the automatic key insertion. 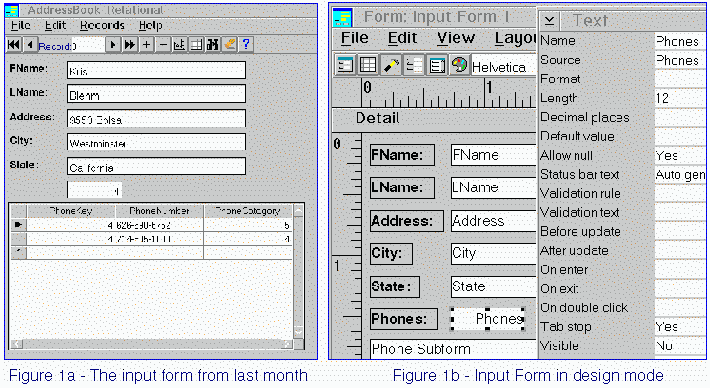 The program for this session was to complete the input form that we developed last month. We left off with the form as shown in fig. 1a.
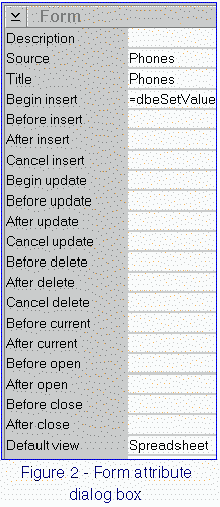
First we'll fix the key-fields connection. It turns out that the code to do this automatically was not put into DBExpert by the original designers. (Sundial will be fixing this in a subsequent release.) Therefore, we will use Randell's work-around which involves inserting some DBExpert functions in the attribute dialog of the Phone Subform. This code will tell the subform: as soon as a phone number is typed in get the contents of the current AddressBook_Relational.Phones field and put it in the current Phones.PhoneKey field. (In case you forgot the dot-naming convention is: Table_Name.Field_Name.) The functions will be inserted into the attributes section of the Phone Subform because that is the form that gets all phone numbers. Before we take an in-depth look at the functions it might be instructive to take a closer look at what attributes are and what they do. We will focus on the attributes for Phone Subform (fig. 2) but this discussion will hold for any Form Attribute Dialog.
Title is the name of the form that DBExpert formulas or a macro (REXX code) uses to refer to the form. Now for the neat stuff. Begin insert, Before insert, After insert, and Cancel insert have to do with happenings when data is added to a new record in a table. A DBExpert function or a call to a macro in Begin insert will be activated as soon as something is entered anywhere in any part of the form. A DBExpert function or a call to a macro in Before insert will be activated as soon as a form control is filled in (signified by a tab key press) but before the table(s) involved are filled with the data. A DBExpert function or a call to a macro in After insert will be activated as soon as the table(s) involved are filled with the data. A DBExpert function or a call to a macro in Cancel insert will be activated if the intended data is canceled. Begin update, Before update, After update, and Cancel update and Begin delete, Before delete, After delete, and Cancel delete have the same timing as the four insert controls but are activated only when existing data is modified or deleted. Now let's delve into the work-around. 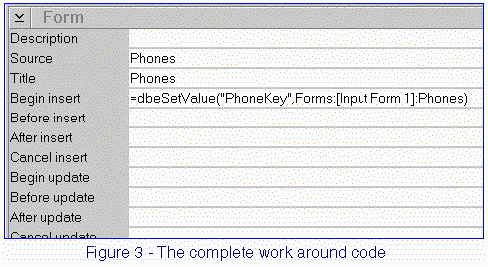 From figure 3 you can see that event begin insert contains: =dbeSetValue("PhoneKey",Forms:[Input Form 1]:Phones). All this looks formidable until it is pulled apart and inspected piece by piece. The overall function is: dbeSetValue(). The general form of this function is:
The value we want this control set to is the machine generated number in AddressBook_Relational.Phones (fig. 5) for the person to be associated with this phone number (the control with the 4 in it in fig. 1). We tell DBExpert to get the data by the construct: Forms:[Input Form 1]:Phones. 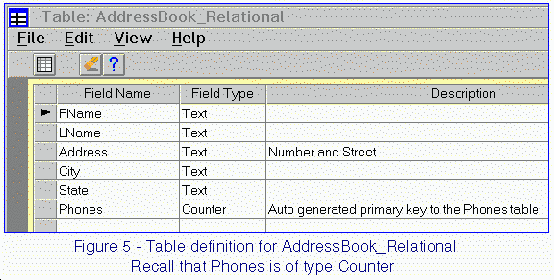
Moving On OK. We have taken care of the connection between Address_Relational.Phones and Phones.PhoneKey. On to changing the Phone Category to a textual display instead of the reference key number. In fig. 1a the Phone Category is shown as a number. We want to see text telling us what the service is. Again we complete some attributes and the job is done (fig.7). 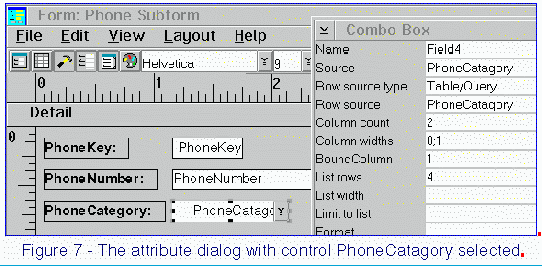 Attributes Source, Row source type, Row source, column count, Column widths, and Bound column will be filled in. Source is the name of the field (in the table associated with this form) that will receive the data from the Row source. IMPORTANT OBSERVATION: The reason that this control is called source instead of destination is because the named field is the source of the data being displayed in the control when one steps through a table one record at a time. Remember that a form can display data and allow changes to the data. When such changes are made the source field of the old data becomes the destination field of the updated data (or new data; which is our case). The fact that the source data might be translated by another table (as we are doing) is simply an added complication. This construct, that the source is both a source of data for display AND the destination for changed/new data must be fully understood to avoid going bonkers. In the prior paragraph I noted we are translating data from one field using information from another table before displaying it. Attributes Row source type, Row source, Column count, Column widths, and Bound column allow us to do that translation. Row source type informs DBExpert to get the translating data from a table, query, list of values, or list of table fields. Row source tells DBExpert the actual name of the table or query, presents a list of values, or a list of field names. AddressBook will use table. The table name is entered into attribute Row source which for our project is PhoneCatagory. Column count stipulates the number of fields in the table we are going to use. Column widths stipulates how wide a column will be displayed. A zero width means the data in that field will not be displayed. Bound column is the column number (1 being the left most column) from which data will be taken and sent to the Source field. Notice we have now made a circle with our data; from Row Source back to Source. To recap Phone Form attributes for project AddressBook:
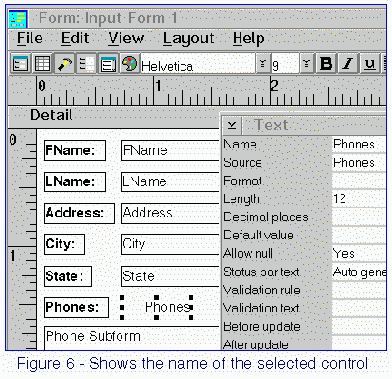
Now that the input form is working it is time to tidy up its looks. We know we do not need to see the control Phones in Input Form 1 to use the form. We will never (in fact we can't) enter anything into that control. But DBExpert needs it to connect to the subform, therefore, the control cannot be deleted. The solution is to make the control invisible. This is done by opening Input Form 1 in design mode (fig. 1b), clicking on the Phones control, cursor down the attributes box and change visible to no. Do the same with the Phones text box. Likewise, PhoneKey and PhoneCatagory in form Phone Subform need not be visible. Change their visible attribute to no. One last thing. Notice when the Input Form is active the phone category column heading is Field4. Lets make that read 'Type of Service'. In the design mode of form Phone Subform click on the PhoneCatagory control and type Type of Service in the Name attribute. Now when Input Form 1 is opened it should look like fig. 1c. The Next Meeting Is June 24thNext time we'll look at generating reports from our application. We'll also add some features requested by SIG members to make the project more useful. Everyone is invited. You don't need to have attended before to come to this meeting. Remember, 7 PM on Thursday, June 24th at Heritage Christian High School.
P.O. Box 26904 Santa Ana, CA 92799-6904, USA Copyright 1999 the Southern California OS/2 User Group. ALL RIGHTS RESERVED. SCOUG, Warp Expo West, and Warpfest are trademarks of the Southern California OS/2 User Group.
|
 There were three things yet to be done:
 The Source entry is the table or the query that the form gets its data from and to where it sends any new or changed data. This control is filled in automatically when the field is first created.
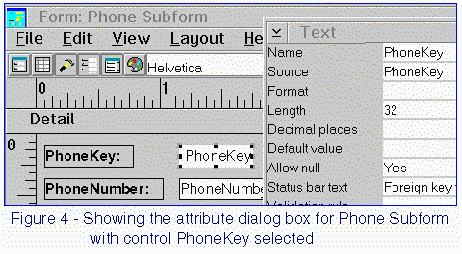 As can be seen in fig. 4 the name of the control we want a value to be inserted into is PhoneKey. Thus PhoneKey is inserted as the control name in the function:
 This construct tells DBExpert to go to a form (Forms:) then gives the name of the form ([Input Form 1]:) and finally tells it from which control in the form (Phones) to get the data (fig. 6). Note: the form name ([Input Form 1]) has square brackets around it because the form name has spaces in it. DBExpert uses [ ] in place of double quote marks (") for this purpose. Also, observe that DBExpert uses a colon (:) as a separator.