SCOUG Logo


Next Meeting: Sat, TBD
Meeting Directions


Be a Member
Join SCOUG

Navigation:


Help with Searching

20 Most Recent Documents
Search Archives
Index by date, title, author, category.


Features:

Mr. Know-It-All
Ink
Download!


SCOUG:

Home

Email Lists

SIGs (Internet, General Interest, Programming, Network, more..)

Online Chats

Business

Past Presentations

Credits

Submissions

Contact SCOUG

Copyright SCOUG


warp expowest
Pictures from Sept. 1999

The views expressed in articles on this site are those of their authors.

warptech
SCOUG was there!


Copyright 1998-2024, Southern California OS/2 User Group. ALL RIGHTS RESERVED.

SCOUG, Warp Expo West, and Warpfest are trademarks of the Southern California OS/2 User Group. OS/2, Workplace Shell, and IBM are registered trademarks of International Business Machines Corporation. All other trademarks remain the property of their respective owners.

The Southern California OS/2 User Group
USA

July 2002


Setting Up Remote Printing

Connecting To a Remote Printer or Print Server...

...e.g. the SMC Barricade Router's Print Server Feature

by Melvin A. Strom

You set up how a printer is connected through the printers in the Connections object, on the desktop. Several methods open up printer configuration notebooks:

  1. highlight a printer and click on 'Selected' from the window's menu; or
  2. right mouse button (RMB) click on a printer and select 'Properties' from the pop-up list; or
  3. double-click on a printer, then click on the upper left corner of the window and select 'Properties.'

There are two ways, equally effective, you can configure printing to a printer attached to a remote print server, like the print server capability in the SMC Barricade router (but for Win-OS/2 printing, see section below). Each method requires entering or checking off a little information in two or three places:

  1. the Properties notebook for the printer object itself;
  2. the 'TCP/IP Configuration' notebook.

Method 1: Use a \PIPE\LPD_ port Locally

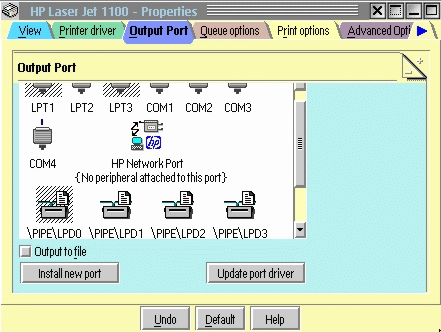
The 'Output Port' tab window displays 'ports' already installed on your system. Besides the traditional stand-alone LPT1, LPT2,... COM1, COM2,..., you may already have available ports designated '\PIPE\LPD0,' '\PIPE\LPD1,'... These ports provide the means to print to a printer attached to a separate print server someplace, typically on a LAN.
Prntprt2

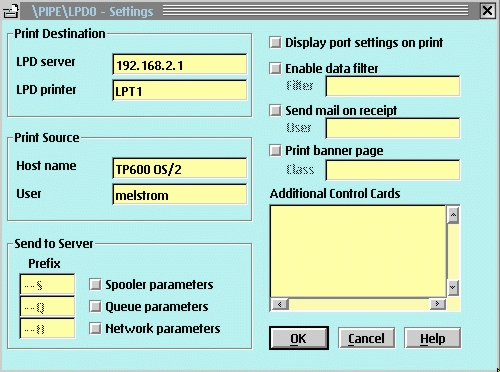
It does not matter which of the available \PIPE\LPD_ ports you choose - these ports are on your machine, and you're the one choosing to which one you will attach the selected printer. Either double-click one or RMB click one and select 'Properties,' and you will see the 'Settings' screen:
Prntprt3

Getting the connection to work requires information only for 'LPD server' and 'LPD printer'.

Printer Properties Notebook

LPD server

'LPD server' (to which the printer is attached) is one of only two required fields, and you need to enter the information in an expected form. You can most easily identify the server with its numeric network IP address - the four-part number (period punctuated), each part itself a number between 0 and 255. The SMC Barricade router always has an address of 192.168.2.1.

Alternatively, for some other server, you may know or find out the name assigned to it, e.g. prntserv1.univ.edu.

LPD printer

The 'LPD printer' field also requires information in a specific form, and a 'name' will not be what you might expect (e.g. 'Epson Color Stylus 820'). This field simply names the port that the printer is connected to at the print server, typically one of the traditional LPT or COM ports. For the SMC Barricade (7004ABR), there is only one possibility: enter 'LPT1' - not case sensitive. Note, however, that no colon follows the name.

(Note: Other Barricade models, to say nothing of other manufacturers, may require a different name here - e.g. 'LP' - so you will need to double-check the owner's manual.)

'Print Source' and other fields

'Host name' and 'User name' are entirely optional, and there is no constraint on form, words, etc. Separator sheets that the print server inserts (to help identify print jobs easily in the output tray) will print this information, for example.

'Send to server' and other check boxes also do not affect the basic functioning of the printing.

Enabling Port

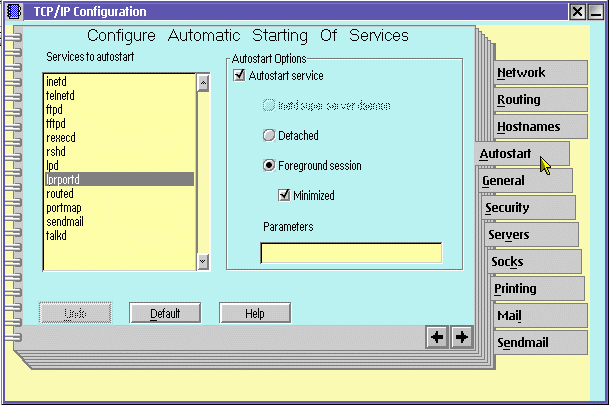
In order for you to print to a printer connected to a print server (i.e. through one of the '\PIPE\LPD_' ports), your computer must first make those ports active, via a program called LPDPORTD. But a default system installation does not automatically do that; you have to tell the system to automate the process. That setup only requires checking two boxes in the 'TCP/IP Configuration' notebook.

  • From the desktop, click through 'Programs' > 'TCP/IP Internet (LAN)', in which you'll find the 'TCP/IP Configuration' notebook (if you can't find it, see note below).

    Prntprt4

  • The fourth tab, 'Autostart,' lists a dozen programs (services), among them LPRPORTD. Highlight LPRPORTD

  • Check 'Autostart service' (i.e. it will automatically start and run upon boot)

  • Check either 'Detached' or 'Foreground session' (they're mutually exclusive); the choice makes no difference in functionality. If you should happen to pick 'Foreground,' then 'Minimized' or not also makes no difference in functionality. Choosing 'Minimized' will likely be simpler, just because it will relieve you of having later to minimize the window yourself, and help avoid the mistake of 'closing' (i.e. shutting down) the program instead of 'minimizing' it (i.e. making it invisible, but running in the background).

  • There is no separate 'Exit' or 'Close' button; just click the upper-right 'X.' You'll be asked about saving vs. canceling changes; be sure to 'Save,' and then answer 'No' to a question about 'sendmail.'

The next time you boot the system, LPRPORTD will run, enabling printing to any '\PIPE\LPD_' port.

Note on TCP/IP Configuration Notebook:

If this object has somehow got lost or misplaced, you can still open it:

  • Open an OS/2 command line session
  • Change to the tcpip\bin subdirectory (type 'cd \tcpip\bin' at the command prompt)
  • Type 'tcpcfg' and press return. The notebook will open.

You can (re)create an icon for this program by using the 'Program' template in the 'Templates' folder.

Disk Space Caution:

In case your hard disk might be rather full, or you use multiple partitions on the disk for various functions, you need to tend to disk space issues. In the process of printing to a \PIPE\LPD_ port, the system writes a temporary file, often rather large, to your hard disk. One line in the C:\config.sys file defines where this (and often other) temp files go. The amount of space the system needs there will vary greatly, depending on how many different jobs might be going to the printer at any one time, and their size. Recent experience suggests that you may need at least 15 MB free, just for a single print job. If the drive with the temp directory is too small, or fills up, you will get no message of warning or information; the printing simply will not proceed. So you need to check and (re)define that TEMP location to a drive or partition with sufficient space.

With any word processor or text editor, open config.sys in the C:\ directory. Someplace there will be (a) line(s) that resemble(s):

SET TEMP=J:\TEMP
SET TMP=J:\TEMP

If there is more than one such (set of) line(s), the last ones will be operative. If the drive letter does not point to a drive with sufficient free space, you will need to change it.

Method 2: Use an LPT_ port Locally

Conceptually, this method involves configuring the printer object as though the printer were connected to a parallel port on your workstation, but redirecting the output instead to the remote print server, where the printer actually is attached. For printing from Win-OS2 apps, you must run this process.

Printer Properties Notebook

Open up the Properties notebook of the printer connected to the (remote) print server (see above), and under the Output port tab, choose (double click) on one of the availabe LPT ports, e.g. LPT2 (note that PCs nearly universally, by default, map LPT1 to the parallel printer connector on the back of your own workstation, so choose something else here). There is nothing else to do here; just close the notebook.

TCP/IP

This method involves two simple steps for TCP/IP setup.

Step One of TCP/IP Setup

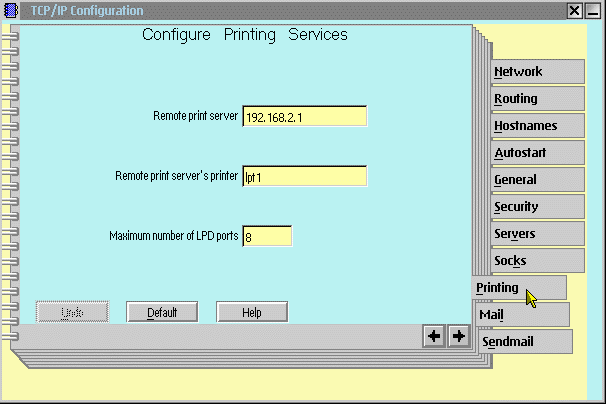
First, open the TCP/IP Configuration notebook (see above, under Method 1, for finding and opening). The ninth tab, Printing, has the two fields that you must fill in properly:
Prntprt5

Remote print server

Here you enter the network address where the printer is attached; simplest is the four-part numerical IP address (see above, under Method 1). For the SMC Barricade that number is always 192.168.2.1.

Remote print server's printer

Here the configuration is asking for the print server's port (not your workstation's - you set that above, in the Printer Properties notebook). For the SMC Barricade (7004ABR), that is always LPT1 - it is not case sensitive; do not include a closing colon.

(As noted above, other manufacturers, and even other Barricade models, may require a different name here, like 'LP,' so you'll need to consult the owner's manual to verify it.)

When you close the notebook, be sure to save the changes; you can answer 'no' to any question about 'sendmail.'

Step Two of TCP/IP Setup

Second, just as for Method 1, you need to have a separate TCP/IP process running. This process is called LPRMON, and it is what grabs the printing output, redirecting it to the remote print server. It knows where to send that output from the settings entered above, in the TCP/IP Configuration notebook.

Unlike in Method 1, this process is not one that you set to start from the Autostart tab of the TCP/IP Configuration notebook. Instead, you must start it separately, but you can still automate it at boot up if you include the command in the STARTUP.CMD file in the root directory of your boot drive.

  • If you already have a STARTUP.CMD file, open it with any text editor and add the line:
             DETACH LPRMON LPT2
    

    [The last part tells the process which LPT port to monitor and redirect; if you chose some other one, enter the appropriate one.]

  • If you do not yet have a STARTUP.CMD file, it is simple to create. With any text editor or word processor, create a new document with the line above in it. When you save it, you need only be sure that
    1. you save it as a plain ASCII text document (not a WordPro, Word, etc. file), and
    2. that the location you save it to is C:\ (assuming C: is your boot drive; substitute whatever drive letter might be appropriate for you).

If you want to start the process immediately, without rebooting, simply open an OS/2 command window and type 'detach lprmon lpt2' at the command prompt. You may also always start the process manually this way, if you wish.

Printing from Win-OS/2

If you will be printing anything from a Win-OS/2 app, you must use Method 2 to print to a remote printer, since Win-OS/2 does not include 'named pipe' support. Bear in mind that in your overall printing configurations, Method 1 and Method 2 are not mutually exclusive: both LPTPORTD and LPRMON can be running at the same time. It is just a matter that you must set up Method 2 if you want to print from a Win-OS/2 app.

With LPRMON running, and the TCP/IP Printing Services properly configured, remote printing from Win-OS/2 requires only selecting the proper port connection for the printer. Recall that LPRMON will redirect printing from the specified LPT_ port to the remote print server. In Win-OS/2, there are different 'native' Windows LPT_ ports and LPT_ ports for the underlying OS/2 system, and it is the latter that you must choose for the printer connection:

The 'native' LPT_ ports appear in the list as simply 'LPT1:' etc.; the underlying OS/2 LPT_ ports all appear separately, with an appended '.OS2' suffix. Simply select the appropriate 'LPT_.OS2' port and click 'OK.'

There appears to be no functional reason not to use Method 2 for all printing, OS/2 and Win-OS/2. Cosmetically, the information printed on separator sheets differs: Method 2 prints the user name and the IP address of his/her workstation.


For your convenience, the author has provided these instructions in OS/2 help file format. You can download a zip (152,210 bytes) of the inf file.


The Southern California OS/2 User Group
P.O. Box 26904
Santa Ana, CA 92799-6904, USA

Copyright 2002 the Southern California OS/2 User Group. ALL RIGHTS RESERVED.

SCOUG, Warp Expo West, and Warpfest are trademarks of the Southern California OS/2 User Group. OS/2, Workplace Shell, and IBM are registered trademarks of International Business Machines Corporation. All other trademarks remain the property of their respective owners.